Step 1: Sign into your CharityVillage employer account here.
Don't have an account with us? Click the green SIGN IN button at the top right of the CharityVillage home page and then scroll down the next page and click the green EMPLOYER button to get started.
Step 2: Once you are signed in, click Post a Job/Volunteer Listing from the menu on the left.
Step 3: There are two types of job postings to choose from.
Select Nonprofit Job Posting ($298 + taxes) if you are a nonprofit or charitable organization.
Select For-Profit Job Posting ($398 + taxes) if you are a for-profit organization serving the nonprofit sector.
For more information regarding who can post job listings with CharityVillage, click here.
Step 4: Select the type of posting you wish to use. Click here to read more about the different posting options.
Once you've made your selection, click CHOOSE. For this example, we will select the first posting option - Job or Volunteer via template.
Step 5: Scroll down the page and fill in the information for your job posting. The fields marked with a red (*) are required.
1. Title: Enter the title of the position are you are posting for. If you are posting a bilingual position, enter both titles and separate with a forward slash ( / ). Please check the accuracy of the job title. It cannot be changed once your posting has been submitted.
2. Description: Type or copy the information about the position, qualifications, etc., into the box.
Click here to learn tips on how to write an effective job posting.
3. Generate with AI: If you would like to try generating your job description using the built in AI tool, enter the job title and/or enter the information about the position in the description box before clicking the Generate with AI button. However, you can simply enter the job title before clicking the button. This may take a minute to generate so based on how much information you add.
4. Video: Want to share a video to include at the top of your job posting? Please make sure to enter the full length of the Youtube or Vimeo link in this field. If you use a shortened version, it will not work.
5. Work Type: Choose the location where the individual must complete their duties.
Onsite - This position is office-based. A country or state/province is required.
Fully Remote - This position is strictly home-office based. You will still be required to enter a location in the Location field (e.g. Canada if you want to advertise the position across Canada and the individual is not required to live in a specific city or province)
Hybrid - This position is both office and home-based (flexible location). A country or state/province location is required. Input the location(s) in the next field called, Job Location.
6. Location: Enter one or more locations for this field.
7. Employment Type: Select the employment status you are hiring for from the drop down menu.
8. Job Categories: Select the job category or categories from the drop down menu to further define your position.
9. Required Career Level: Select the career level for your position.
10. Years of Experience: Select the ideal years of experience a candidate should have for the position.
11. Salary Range: Choose the salary range or add the precise base salary. Including salary or a range will improve application rates, candidate fit, transparency, equity and inclusion.
IMPORTANT NOTE: For BC Employers - of November 1, 2023, new legislation within the Pay Transparency Act require BC employers to include Salary or Wage information on publicly advertised job postings.
Starting January 1, 2026, Ontario’s Pay Transparency Act comes into effect, requiring Ontario employers with 25 staff or more to include expected compensation or a salary spread (max. spread: $50,000) when posting jobs online. You must also disclose if AI is used to screen or assess candidates. You can learn more by visiting the Ontario Working for Workers Act amendments on Government websites.
12. Duration (specific to volunteer positions): This field is only for volunteer listings.
13. Required Languages: Select the language(s) required for the individual to complete their duties
14. Required Skills: Select the required skills for the position
15. Publishing Date: Select the date you wish your job posting to appear on the CharityVillage job board. Please ensure this date is accurate, as it cannot be changed once you have submitted it to go live.
16. Application Deadline: The number 60 is the maximum number of days your listing can be live on CharityVillage. Adjust the number if you wish to remove your listing sooner and a message will pop up on the posting form and let you know the date your listing will be removed. If you want to extend the deadline within the 60 day period, you will need to contact help@charityvillage.com to do so.
Example:Based on the start date and runtime, the job will go offline on 6/30/2025.
17. & 18. How to Apply: Select from one of the three options how you wish to receive applications.
a) Use Quick Apply - Candidates will apply directly via the email address you provide under the Application email field in the next section of the posting form. You can add more than one email. The email(s) added will be notified each time an applicant applies (which will also include any document(s) the candidate attaches) and you can also manage the applications in your CharityVillage account.
Important note, additional email addresses you add in the application email field below will not be able to access your CharityVillage account unless they have been added as an additional user.
b) Manage job application using the CharityVillage integrated Applicant Tracking System - View and manage applications in your CharityVillage account only. This is the same as the Quick Apply method except the email address tied to your employer account will be the only email that will receive notifications that an applicant has applied. The notification email will not include any document(s) the applicant attaches. You must review their information/documents in your employer account.
c) Add an external URL to direct applicants from the Apply button to your webpage - If you would like to redirect applicants to a specific webpage for example, enter it in this field.
19. Which of the Quick Apply Features would you like enabled? Quick Apply allows you to select the mandatory requirements that a candidate must complete to submit their application. e.g. Resume, Cover letter and screening questions.
If you select to add screening questions, the Questions section will appear below. Enter one or more questions and select the box under it if the question must be answered. Select the Add Another button to continue adding additional questions.
Step 6: Once you are finished filling out the posting form, click NEXT.
Step 7: Selecting one or more posting upgrades on the Posting Upgrades page is optional but highly recommended.
Want to reach students and new grads with your job listing? Be sure to select the following option located at the top of the list.
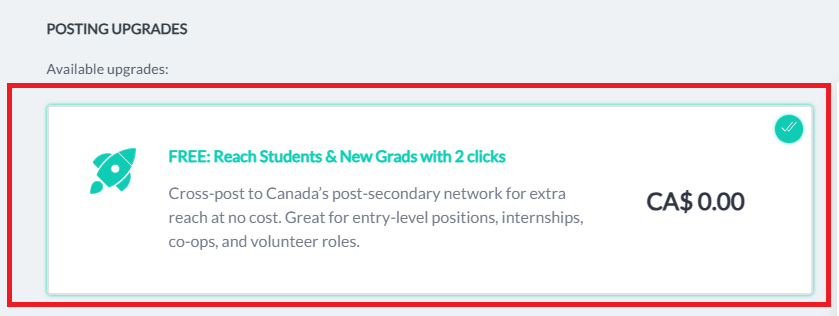
We also recommend selecting Top Posting if you want your posting to stand out and gain the most views.
Once you've finished with this page, click NEXT.
Step 8: Fill in the billing information page. You will have the option later down the page to save the address to your "Saved Addresses." You can then select the address from the drop down at the top right of the billing page to use it again.
You can select to pay via credit card or invoice located at the bottom of the page
before you submit your listing to be published. If you choose to pay via invoice, this will not delay your listing going live on our site.
Important Note: You must select the box that you have read our privacy policy and GTC or you will not be able to move on to the final step.