Step 1: Click here and login to your refsavvy account that was created on your behalf by a CV staff member.
Don't have an account? Please email help@charityvillage.com so we can get you set up.
Step 2: Click Questions from the menu on the left and then the CREATE button at the top right.
Step 3: Use the fields on the screen to create your question. Once you're finished, click SAVE.
Question Name: What name do you want to assign your question? This will help you to identify this question in your account if you want to re-use it when creating a new survey.
Question Category: The drop down provides a list of categories for you to choose from that would specifically apply to your question.
Question Text: This is the question that will appear on the survey.
Example: Give an example of a time this individual took initiative?
Instructions: If you would like to add any specific instructions to the individual who will be answering the question, add it here.
Example: Answer "N/A" if you cannot give an example.
Question Type: There are a number of questions types to choose from the drop down menu. For this example, we will use "short answer."
Tags: Add tags to make the question easily searchable when you've reached the stage of creating your survey.
Min Length (chars): The minimum number of letters and spaces the response must have.
Max Length (chars): The maximum number of letters and spaces the response must have.
Preview: At the bottom of the page, you can view what the question will look like on the survey.

Step 4: Once you are finished, click SAVE at the top right. Continue with the same process to create additional questions.
Step 5: When you are finished creating all your questions, it's time to create the eReference check survey. Just click SURVEYS from the left hand side of your dashboard and then the CREATE button at the top right.
Step 6: Click Create a Survey and then CONTINUE. For instructions on how to Generate a Survey using a brief description, click here.
Step 7: Fill in the required fields at the top of the page and then drag and drop the questions you wish to use in your survey.
a) Survey Name: We suggest using the title of the job or volunteer listing.
b) Survey Type: Select either Employment Reference (paid position) or Volunteer Reference (unpaid position) from the drop down menu
c) Tags: Add tags to make the survey easily searchable
d) Survey View: Leave the selection as is. Currently, there are no other options available to select.
From the Available Questions box on the left, scroll through and drag each question you wish to appear in this survey to the box on the right called, This Survey's Questions.
At the bottom of the Available Questions box, there is a field that allows you to search for a question without requiring you to scroll through the list.
Step 8: Once you are finished creating your survey, click SAVE.
Step 9: If you are ready to send the eReference check, click either HOME or FILES from the left hand side and then click CREATE FILE.
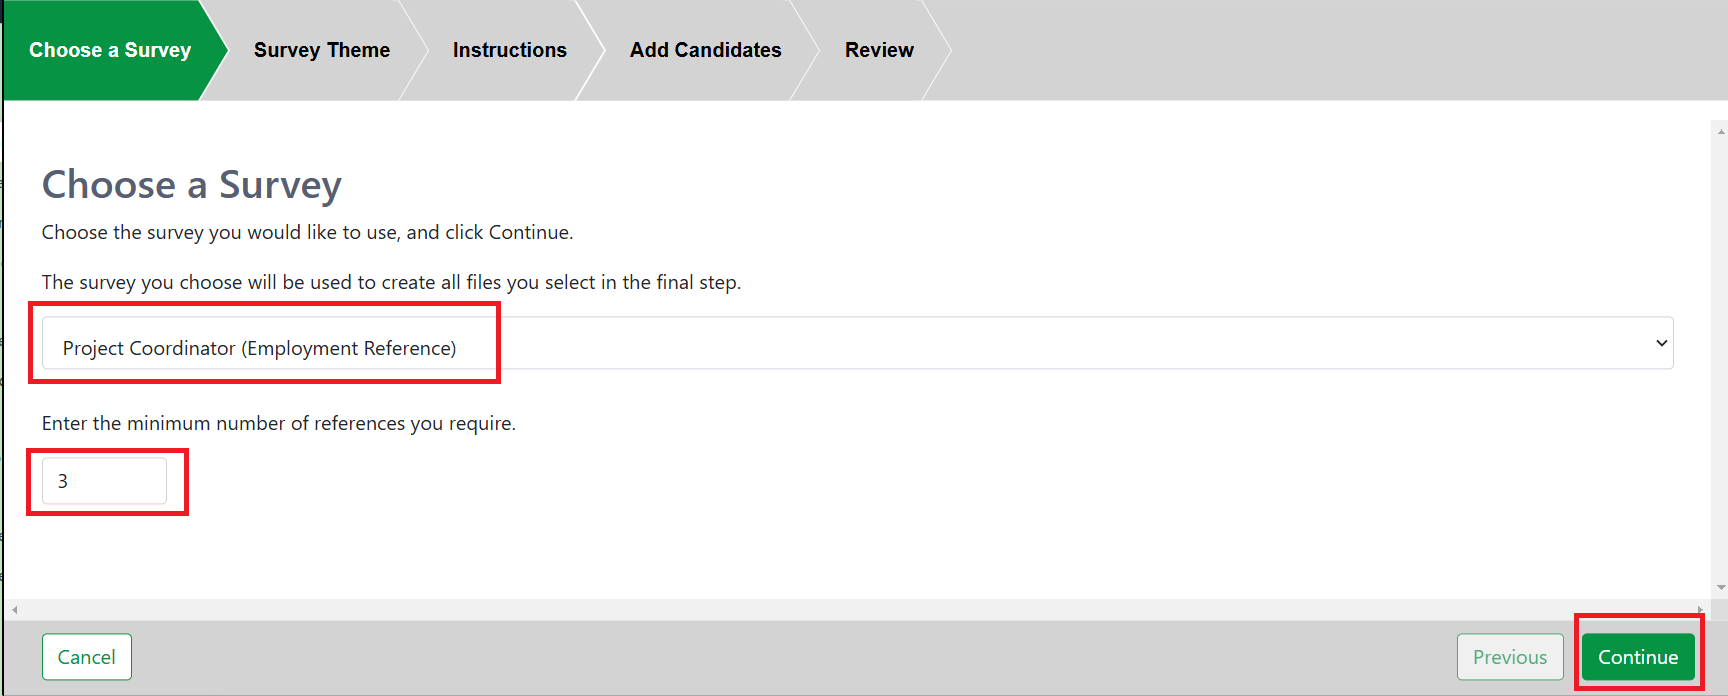
Step 10: Select the survey you wish to use from the drop down list and then the minimum number of references the candidate is required to provide. Click CONTINUE to move to the next page.
Step 11: For the Survey theme, choose the theme you have created for your account. If you have set up multiple themes, choose the theme from the drop down menu that you wish to use.
If you haven't created a theme, you can do so by clicking here and following the instructions. This article provides instructions on how to upload your organization's logo and use your organization's colours. It will also show you where you can review or customize the messaging that will be sent to the individual filling out an eReference Survey.
Step 12: If you have any special requests, guidelines or instructions for the candidate(s), include them in the field at the top. This will be shown to them before they enter their references.
Example: Please ensure you double check the contact information of each reference you would like contacted.
Step 13: On this page, enter the name and email address of the candidate you would like to send this request to.
To send a request to multiple candidates at the same time, click the Add Another Candidate button.
To delete an entry, click the red x button to the right of the email address field.
Step 14: Please review the information you entered to ensure it's correct. Once you click the Create Now button, this cannot be undone.
Step 15: Click the Finish button at the bottom right of the page.